
Using Spark Connect from .NET to run Spark jobs on Databricks
Goal of this post
This post aims to show how we can create a .NET application, deploy it to Databricks, and then run a Databricks job that calls our .NET code, which uses Spark Connect to run a Spark job on the Databricks job cluster to write some data out to Azure storage.
In the previous post, I showed how to use the Range command to create a Spark DataFrame and then save it locally as a parquet file. In this post, we will use the Sql command, which will return a DataFrame or, in our world, a Relation. We will then pass that relation to a WriteOperation command, which will write the results of the Sql out to Azure storage.
The code is available HERE
Overview
Locally, everything is fine, start a Spark server and connect to it locally. We don’t need to worry about clusters or permissions, but as soon as we want to run something on Databricks, we need to consider authentication and clusters (well, we don’t, but Databricks won’t run our code without it).
Today, although Databricks supports Spark Connect (note: I’d like to see more documentation on this, to be honest), the “Notebook” experience in Databricks is still limited to Python, Scala, R, and SQL. Not being able to load additional language kernels means we don’t get the notebook experience today, maybe one day there will be more options?
In Databricks, they have jobs that can call several things like Python wheels, notebooks, and jar files but not any old executable, so we will need to create some wrapper code; probably the easiest is a notebook, but it could just as easily be a Python file.
We can then create a Databricks job to call the notebook, which will call our .NET code. We will need information such as the cluster-id, workspace URL, and bearer token to authenticate with Databricks.
The notebook will start, and then we can gather configuration values to connect to the cluster. Note: However, we don’t need to do this - we could run our program entirely outside of Databricks, start a cluster, and then run the job - I just wanted to prove that it can be done so that we will deploy and run entirely on Databricks. Maybe in the next post, I will do that: have a .NET app start a cluster, run a job, and then terminate the cluster without having to copy the app to DBFS.
Code
CSharp
We are going to need to pass some arguments into our app - later on (not in this post, future “later on”), I’ll start building out the objects we know and love, like SparkSession, and when we do that, then we should follow the Python approach and store the databricks config in the .databrickscfg file, but for now we will just look to get the whole process working (think this as very much a POC rather than prod code):
string GetArg(int i) => Environment.GetCommandLineArgs()[i];

var databricksWorkspaceUrl = GetArg(1);
var databricksClusterId = GetArg(2);
var bearerToken = GetArg(3);
We will need two new objects that we didn’t have for connecting locally last time, a Metadata and a UserContext. The metadata objects are used for storing the additional gRPC headers that we will need (the bearer authorization token, and the cluster id). The user context stores the username and ID, although in my testing, I have to pass something seemingly ignored and replaced with the actual details associated with the bearer token. This is one of those things I am not sure if we should call the Databricks API to get some info about the user. Maybe we will need to do something else down the line.
var headers = new Metadata
{
    { "Authorization", $"Bearer {bearerToken}" },
    { "x-databricks-cluster-id", $"{databricksClusterId}" }
};

var context = new UserContext()
{
    UserName = "Ed Elliott",
    UserId = "ed@agilesql.co.uk"
};
We create the channel as before. Encryption is taken care of if we use https:// in the databricksWorkspaceUrl:
var channel = GrpcChannel.ForAddress(databricksWorkspaceUrl, new GrpcChannelOptions(){});
await channel.ConnectAsync();
var client = new SparkConnectService.SparkConnectServiceClient(channel);
Now, to call Sql, we will execute a specific command and we will need the results. So far, we have read the response from the server and thrown away anything useful, but now we need to store the relation:
async Task<Relation?> Sql(string sql)
{
    var plan = new Plan()
    {
        Command = new Command()
        {
            SqlCommand = new SqlCommand()
            {
                Sql = sql
            }
        }
    };

//What does the whole plan look like?
    var parsedJson = JsonConvert.DeserializeObject(plan.ToString());
    Console.WriteLine(JsonConvert.SerializeObject(parsedJson, Formatting.Indented));

// Execute it
    var response = client!.ExecutePlan(new ExecutePlanRequest() { Plan = plan, UserContext = context, ClientType = ".NET FTW"}, headers);
    Relation? returnedRelation = null;

    while (await response.ResponseStream.MoveNext())
    {
        if (response.ResponseStream.Current.SqlCommandResult != null)
        {
            //If the response includes a Relation we will get it here
            returnedRelation = response.ResponseStream.Current.SqlCommandResult.Relation;
        }
    }

    return returnedRelation;
}
The important bit is here:
...
while (await response.ResponseStream.MoveNext())
    {
        if (response.ResponseStream.Current.SqlCommandResult != null)
        {
            //If the response includes a Relation we will get it here
            returnedRelation = response.ResponseStream.Current.SqlCommandResult.Relation;
        }
    }
...
The response stream is a series of different possible things, and so we check each response stream for a SqlCommandResult. If we have one, we have a Relation (think of it as a DataFrame here).
Let’s grab the output from Sql:
var dataFrame = await Sql($"SELECT '.NET {Environment.Version}' as Version, '{Environment.MachineName}' as Machine");
Now we need to create our plan that includes writing the data out to Azure storage, passing the relation we got from the Sql command as the input to the WriteOperation command:
//Create a plan - our job is to create a plan and send that plan over to the spark server which executes it
var writeParquetFilePlan = new Plan()
{
    Command = new Command()
    {
        WriteOperation = new WriteOperation()
        {
            Mode = WriteOperation.Types.SaveMode.Overwrite,
            Source = "parquet",
            Path = "dbfs:/mnt/datalake/wow.parquet",
            Input = dataFrame
        }
    }
};
Now we can dump out the plan so we can see what it looks like and dump out the response:
//What does the whole plan look like?
var parsedJson = JsonConvert.DeserializeObject(writeParquetFilePlan.ToString());
Console.WriteLine(JsonConvert.SerializeObject(parsedJson, Formatting.Indented));

// Execute it
var response = client.ExecutePlan(new ExecutePlanRequest() { Plan = writeParquetFilePlan, UserContext = context, ClientType = ".NET FTW"}, headers);
while (await response.ResponseStream.MoveNext())
{

}

Console.WriteLine("Done!");
You can see here in the ExecutePlan call I am also passing the UserContext and a ClientType - these are both available in the Databricks logs, so we can see precisely where our calls are running.
Databricks Notebook
The next step is to create a databricks notebook. In our notebook, firstly we need to mount our storage, here we map a “code” container which will contain a copy of the code to run and also the venerable mr “datalake”:
# Databricks notebook source

if not any(mount.mountPoint == "/mnt/code" for mount in dbutils.fs.mounts()):
    dbutils.fs.mount(
    source = "wasbs://code@gafnxtgipe.blob.core.windows.net",
    mount_point = "/mnt/code",
    extra_configs = {"fs.azure.account.key.gafnxtgipe.blob.core.windows.net": "SECRETKEY"})


if not any(mount.mountPoint == "/mnt/datalake" for mount in dbutils.fs.mounts()):
    dbutils.fs.mount(
    source = "wasbs://datalake@gafnxtgipe.blob.core.windows.net",
    mount_point = "/mnt/datalake",
    extra_configs = {"fs.azure.account.key.gafnxtgipe.blob.core.windows.net": "SECRETKEY"})
We then need the three inputs to the program, the databricks workspace url, the cluster id and the bearer token:
# COMMAND ----------

cluster_id = dbutils.notebook.entry_point.getDbutils().notebook().getContext().clusterId().get()
print(cluster_id)

workspace_url = spark.conf.get("spark.databricks.workspaceUrl")

import os
os.environ['CLUSTER_ID'] = cluster_id
os.environ['WORKSPACE_URL'] = workspace_url
os.environ['BEARER_TOKEN'] = 'secret'
I am not sure if there is a way we can get an auth token without passing in the bearer token but for now using Databricks secrets is enough - it is definetly a question for another day and maybe will make executing simpler? Not sure.
Let’s mark the .NET program as executable and then run it:
# COMMAND ----------

# MAGIC %sh
# MAGIC
# MAGIC chmod +X /dbfs/mnt/code/v1/SparkConnect
# MAGIC /dbfs/mnt/code/v1/SparkConnect https://$WORKSPACE_URL $CLUSTER_ID $BEARER_TOKEN
# MAGIC
Databricks Job
The last step is to create the databricks job that runs the notebook:
resources:
  jobs:
    Run_NET_Job:
      name: Run .NET Job
      tasks:
        - task_key: SCHEDULE_DOTNET_JOB
          notebook_task:
            notebook_path: /Users/ed.elliott@outlook.com/RUN_DOTNET_JOB
            source: WORKSPACE
          job_cluster_key: Job_cluster
      job_clusters:
        - job_cluster_key: Job_cluster
          new_cluster:
            cluster_name: ""
            spark_version: 13.3.x-scala2.12
            azure_attributes:
              first_on_demand: 1
              availability: SPOT_WITH_FALLBACK_AZURE
              spot_bid_max_price: -1
            node_type_id: Standard_DS3_v2
            spark_env_vars:
              PYSPARK_PYTHON: /databricks/python3/bin/python3
            enable_elastic_disk: true
            data_security_mode: SINGLE_USER
            runtime_engine: STANDARD
            num_workers: 1
That’s it
It works? It is that simple?
Yep, package the .NET app and ensure you make it a self contained app so we don’t need to make sure the .NET runtime is installed:
dotnet publish -c Release -r ubuntu.22.04-x64 --self-contained true
Upload the binaries to a container and mount it in databricks (i’ll leave you to figure out your own paths etc, it shouldn’t be hard.)
This is the plan showing that it has executed on our job cluster:
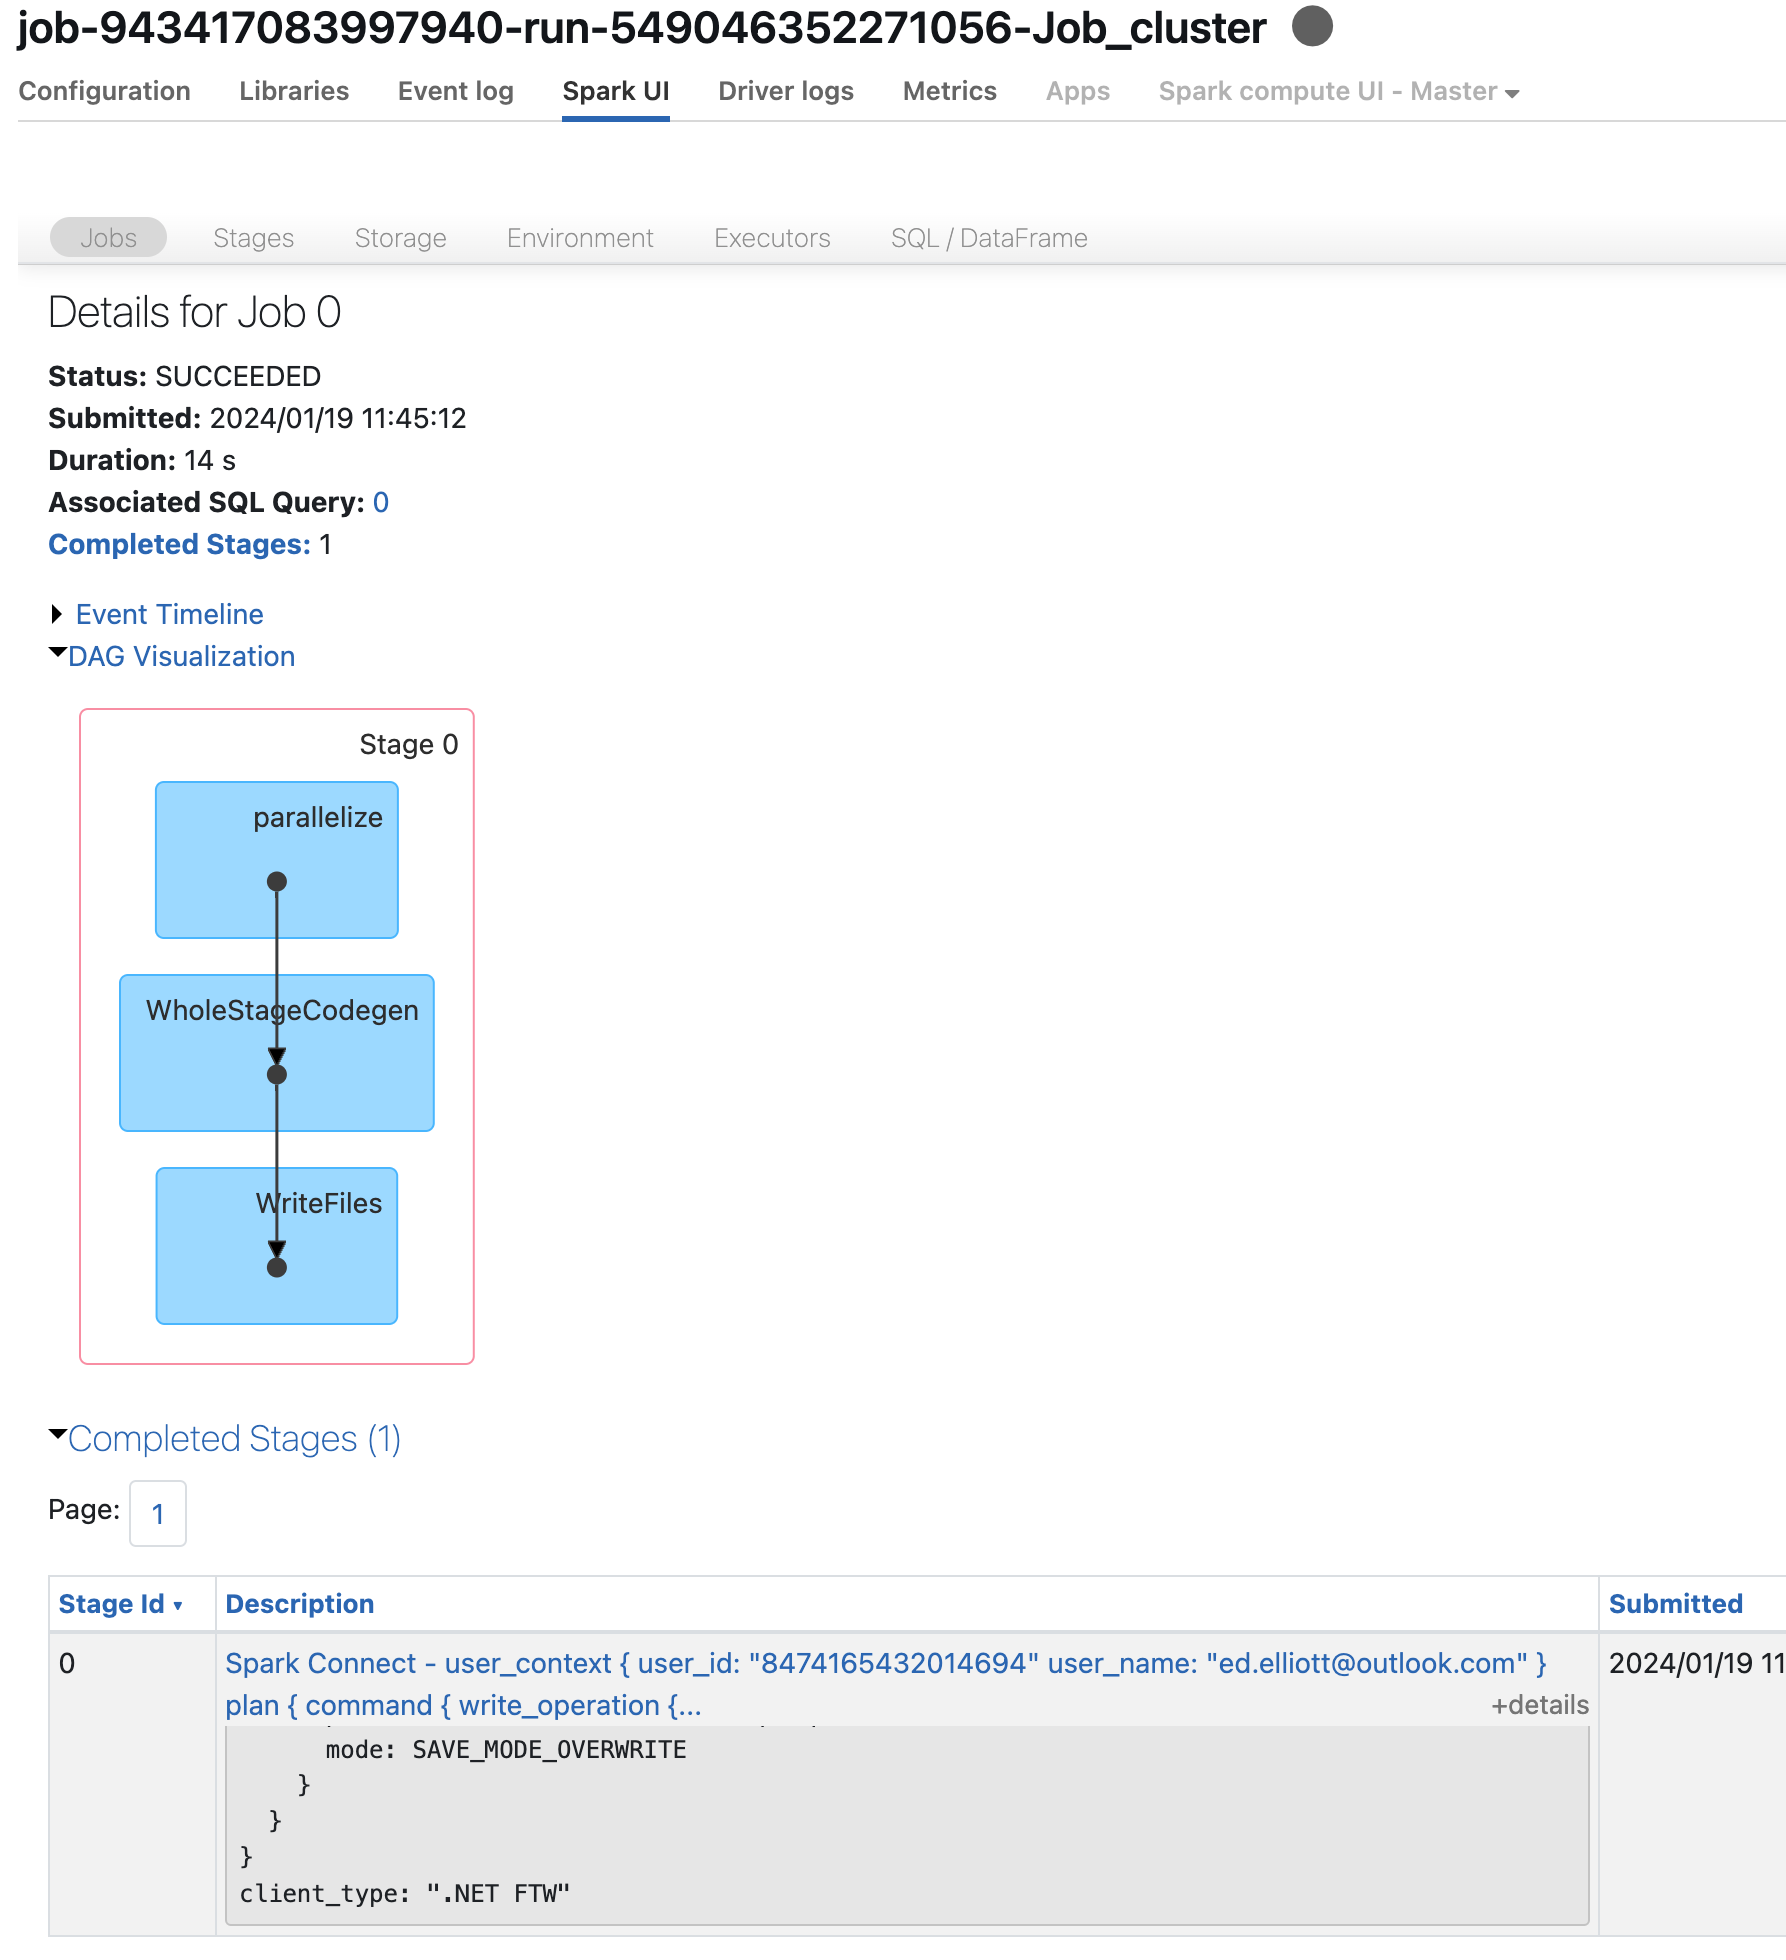
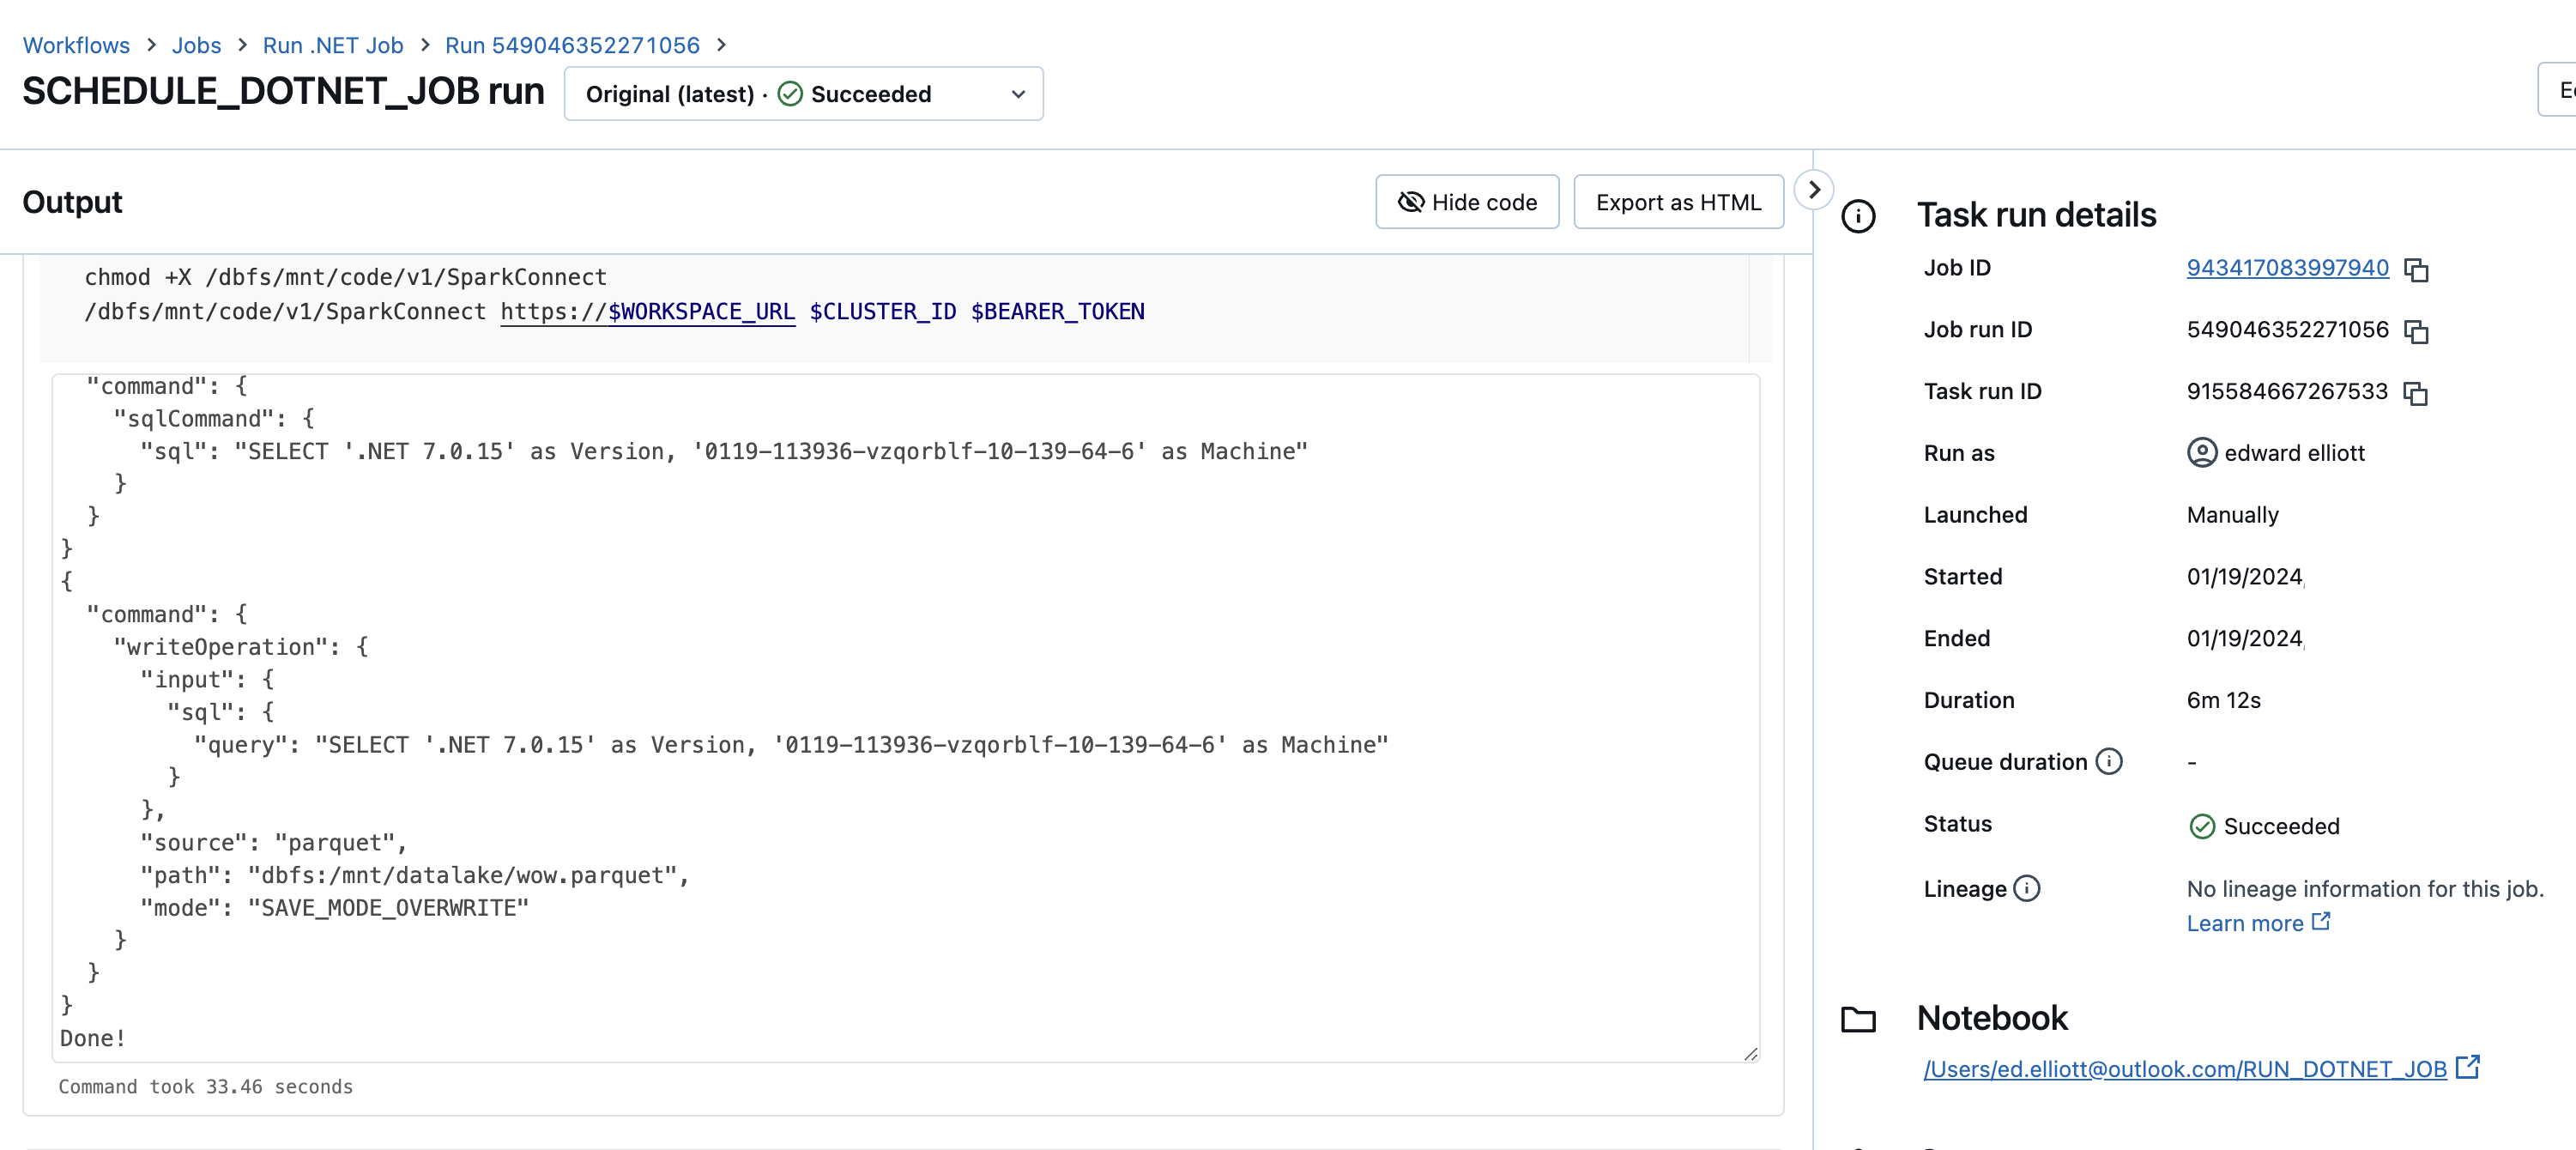
This is the UserContext which is completely different to the one I passed in:

This is the ClientType that I passed in:

Finally, for completeness, this is the contents of the saved parquet file:

Other things to know
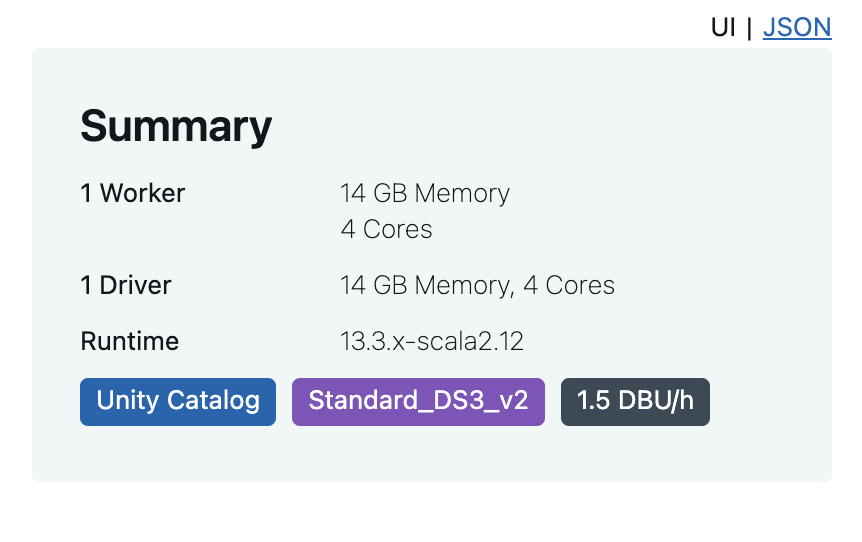
You need to have unity catalog enabled on the workspace and your cluster has to have the Unity Catalog tag otherwise it won’t work. No tag, no good:
Summary
Deploying the actual .NET app to DBFS and executing it from a notebook is probably not the most useful thing in this post but calling the gRPC API and getting a relation back from the server is actually quite important. If we are going to call the API then there will be a mixture of local relations that we can create such as by creating a Range relation and then there are other relations such as the result of running a Sql command which will need to be sent to the server.
There are a few areas that I would like to explore next, in no particular order:
- Apache Arrow - responses are returned in Apache Arrow format so we need to be able to decode these
- UDF’s - are these possible? I have a few thoughts on this and think we can probably get something working but haven’t got it all worked out yet
- DataFrame API - i’d ideally like to have a version of the DataFrame API that calls the gRPC API because it is going to be the easiest way to use Spark from .NET
- Using the Delta API